So to get everything right; the poses, lighting and color, I will have to hire models and set up the scenes to paint from. I ordered costumes from a site online but I needed some shields.
I decided to make some of my own. I needed a few different styles from the later period of the knights Templar. With a limited budget I figured by making my own and would save at least $350. Plus I could customize them to my own liking. It also leaves open the possibility of mass producing a bunch of shields for assembling my own personal army- always a dream of mine.
I found a site online that had some great advice for crafting your own curved shields. Following the instruction on the site, I built my own shield press to make the curved shields I needed.


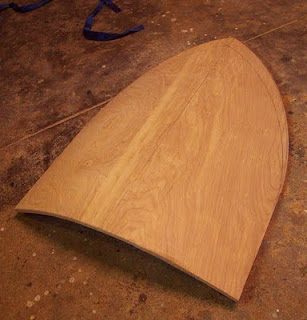
Here is the plywood unclamped after a full day allowing the glue to dry. The two 1/4 sheets are now one 1/2 curved shape. I use a jig saw to cut the shape out.
I then got some old leather belts at the thrift store for straps on the back. The shields typically had a pad on the back to protect the arm. I used an old heavy blanket to make the pad and covered it with suede cut from one of Laura's old skirts. I tacked that on the back, drilled holes for the handled and bolted them on. They were typically riveted, but this was way easier.
Here are the finished shields painted and waiting for the crest to be added.

It may seem like over kill, but it was not too hard to do. Plus I love this kind of procrastinating project.
Now I suppose I should paint the pictures.
*Sigh* Ah, to be self-employed.... ;)
ReplyDeleteNicely done there! This looks like something I would love to be making. If I could I would definitely make myself a blank right-handed heater shield or something of the like because it sounds like fun and painting your own design can look to be your delightful preference. :D
ReplyDeleteI have to say, it is great fun and pretty easy.
ReplyDeleteHighly suggest
you make one for yourself. Once you have the form- which I made out of scraps, you can pop out a shield blank every day if you want and begin handing them out to your own personal army. ;)